Using a Raspberry Pi to Monitor Plant Soil Moisture

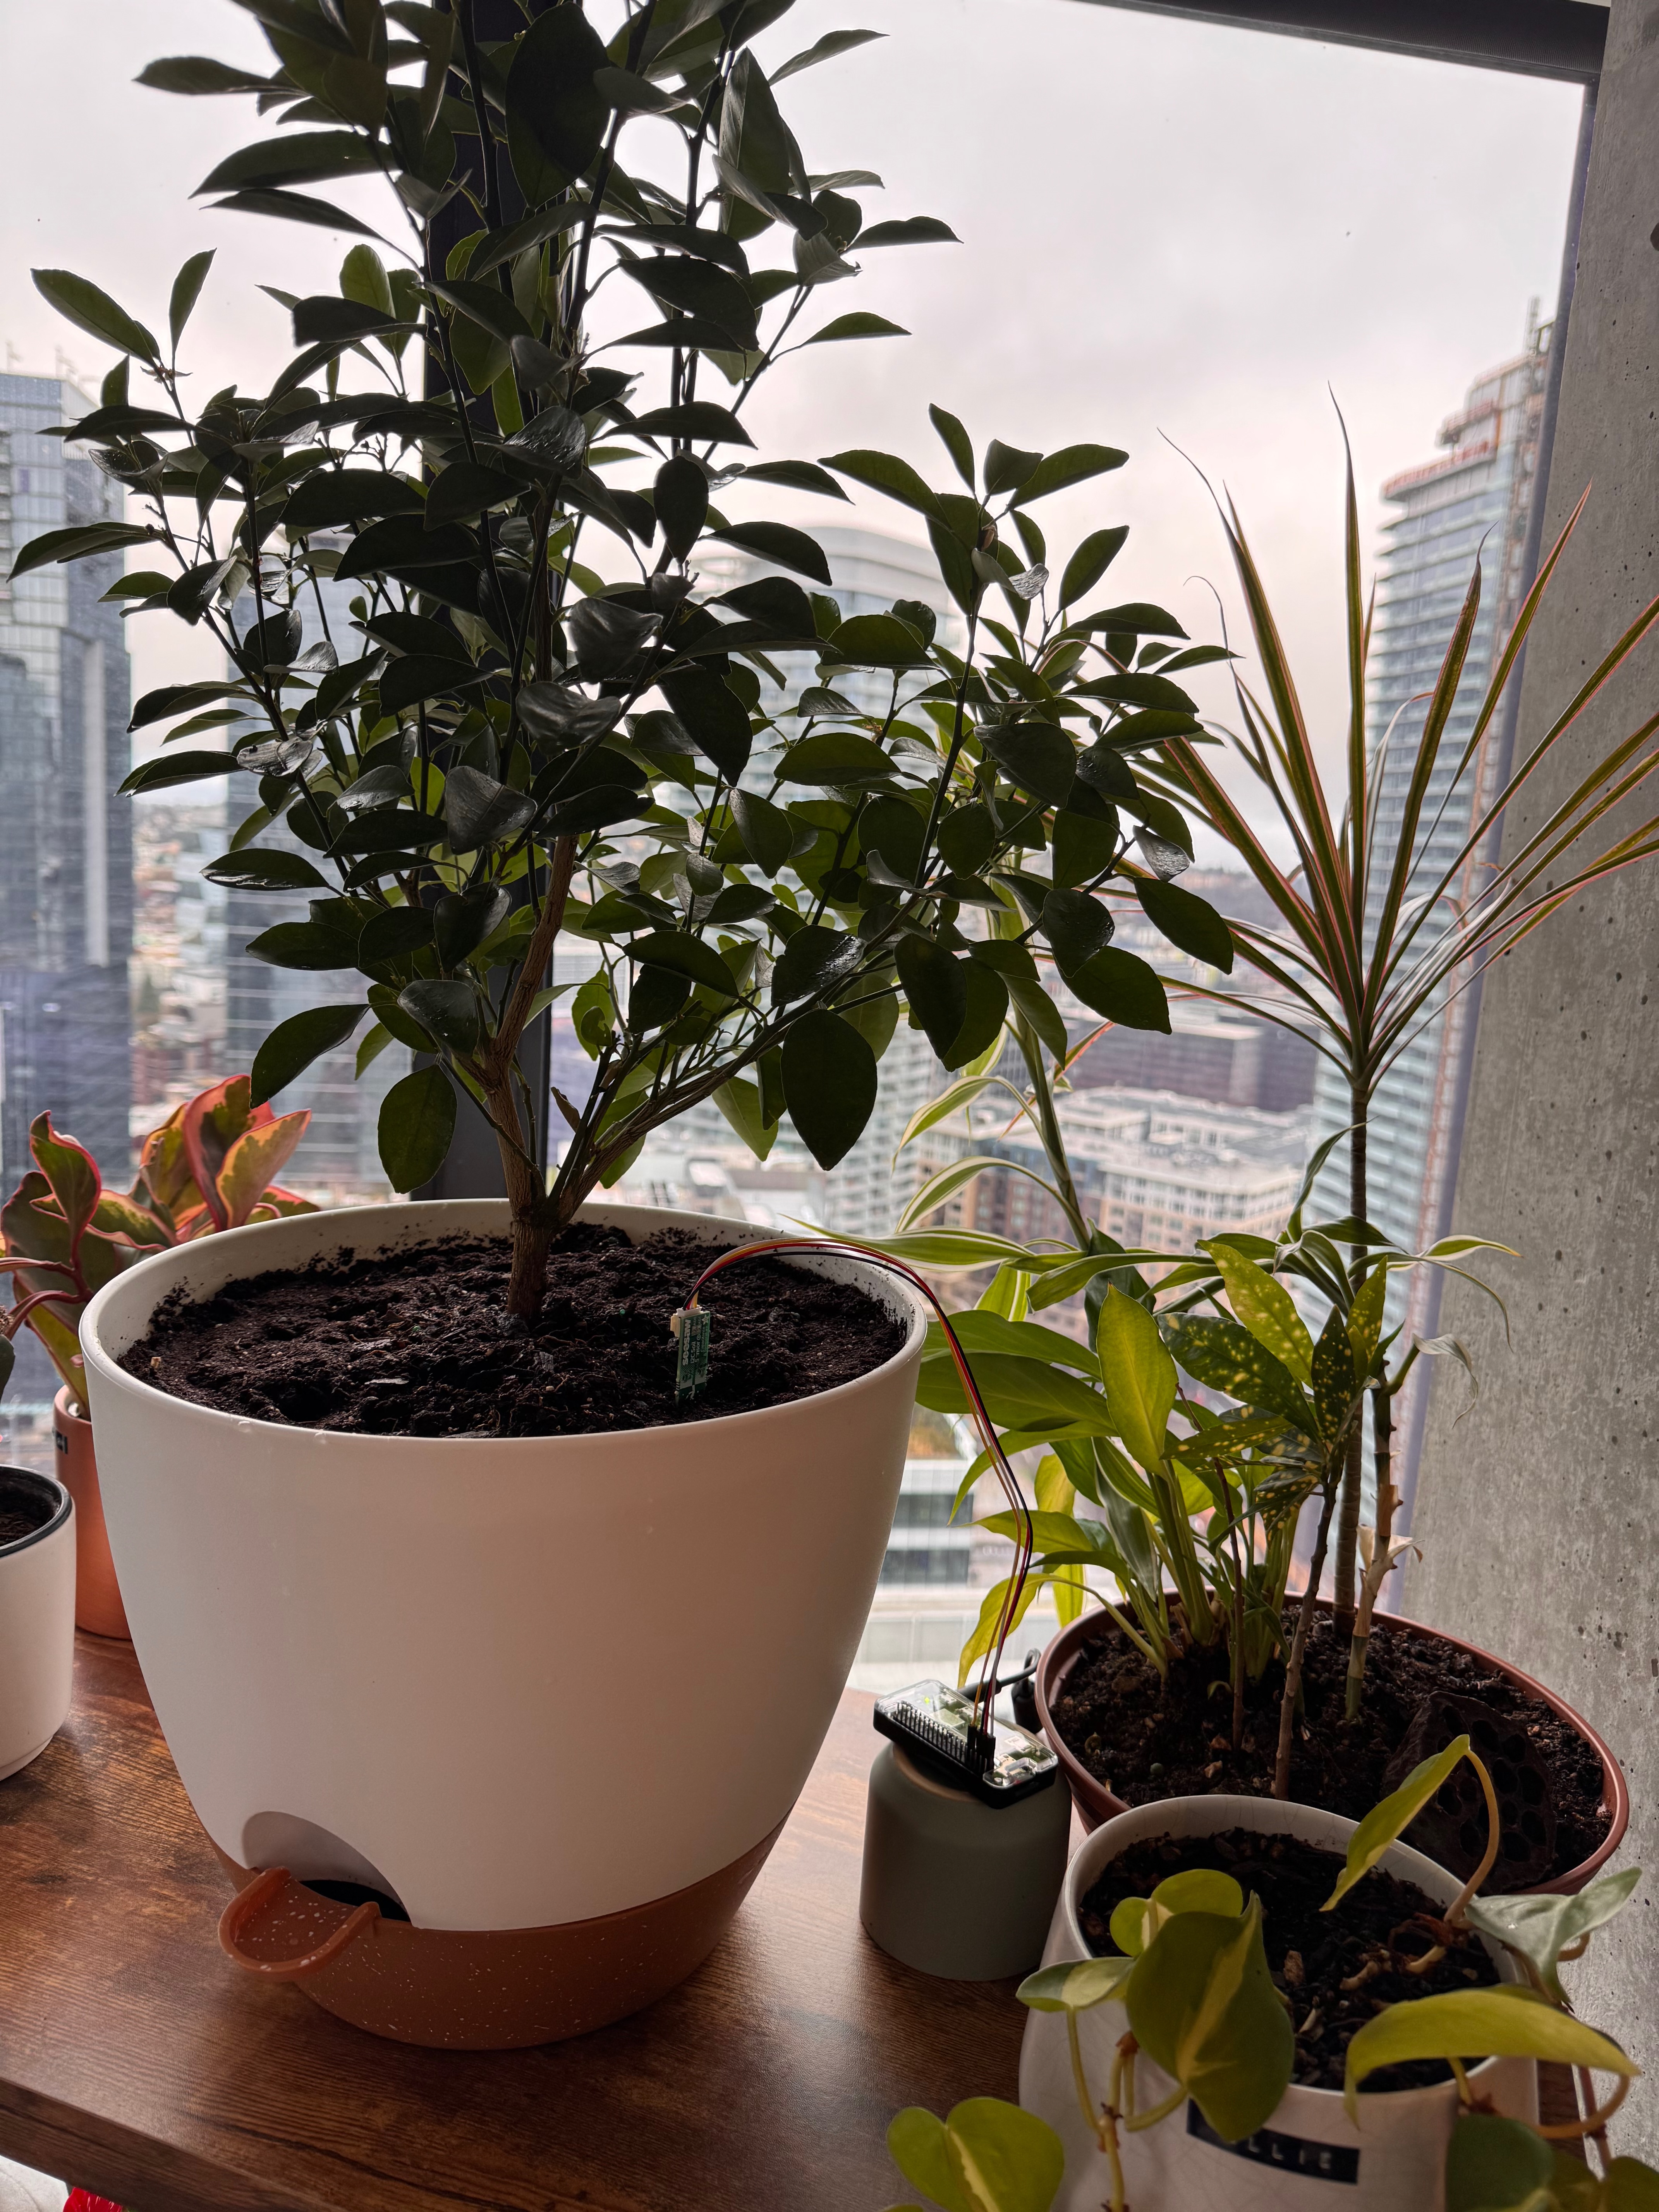
Ever had that moment when you realize your plant parenting skills need a tech upgrade? That’s exactly where I found myself when I started growing a citrus plant with a thirst that seemed unquenchable. So, I decided to build a system that could help me keep track of the plant’s water needs by monitoring the soil moisture levels using a Raspberry Pi, a soil moisture sensor, and some rust code. I know, I know, I could have just bought a moisture sensor and plugged it in, but where’s the fun in that?
Up until now, I’ve only ever built software projects so this would be my first hardware project (even if it is just plugging a few wires in and reading the sensor!).
In this post, I’ll walk you through how I built a plant moisture monitoring system using a Raspberry Pi Zero W 2 and a soil moisture sensor, and how you can build one too.
Hardware
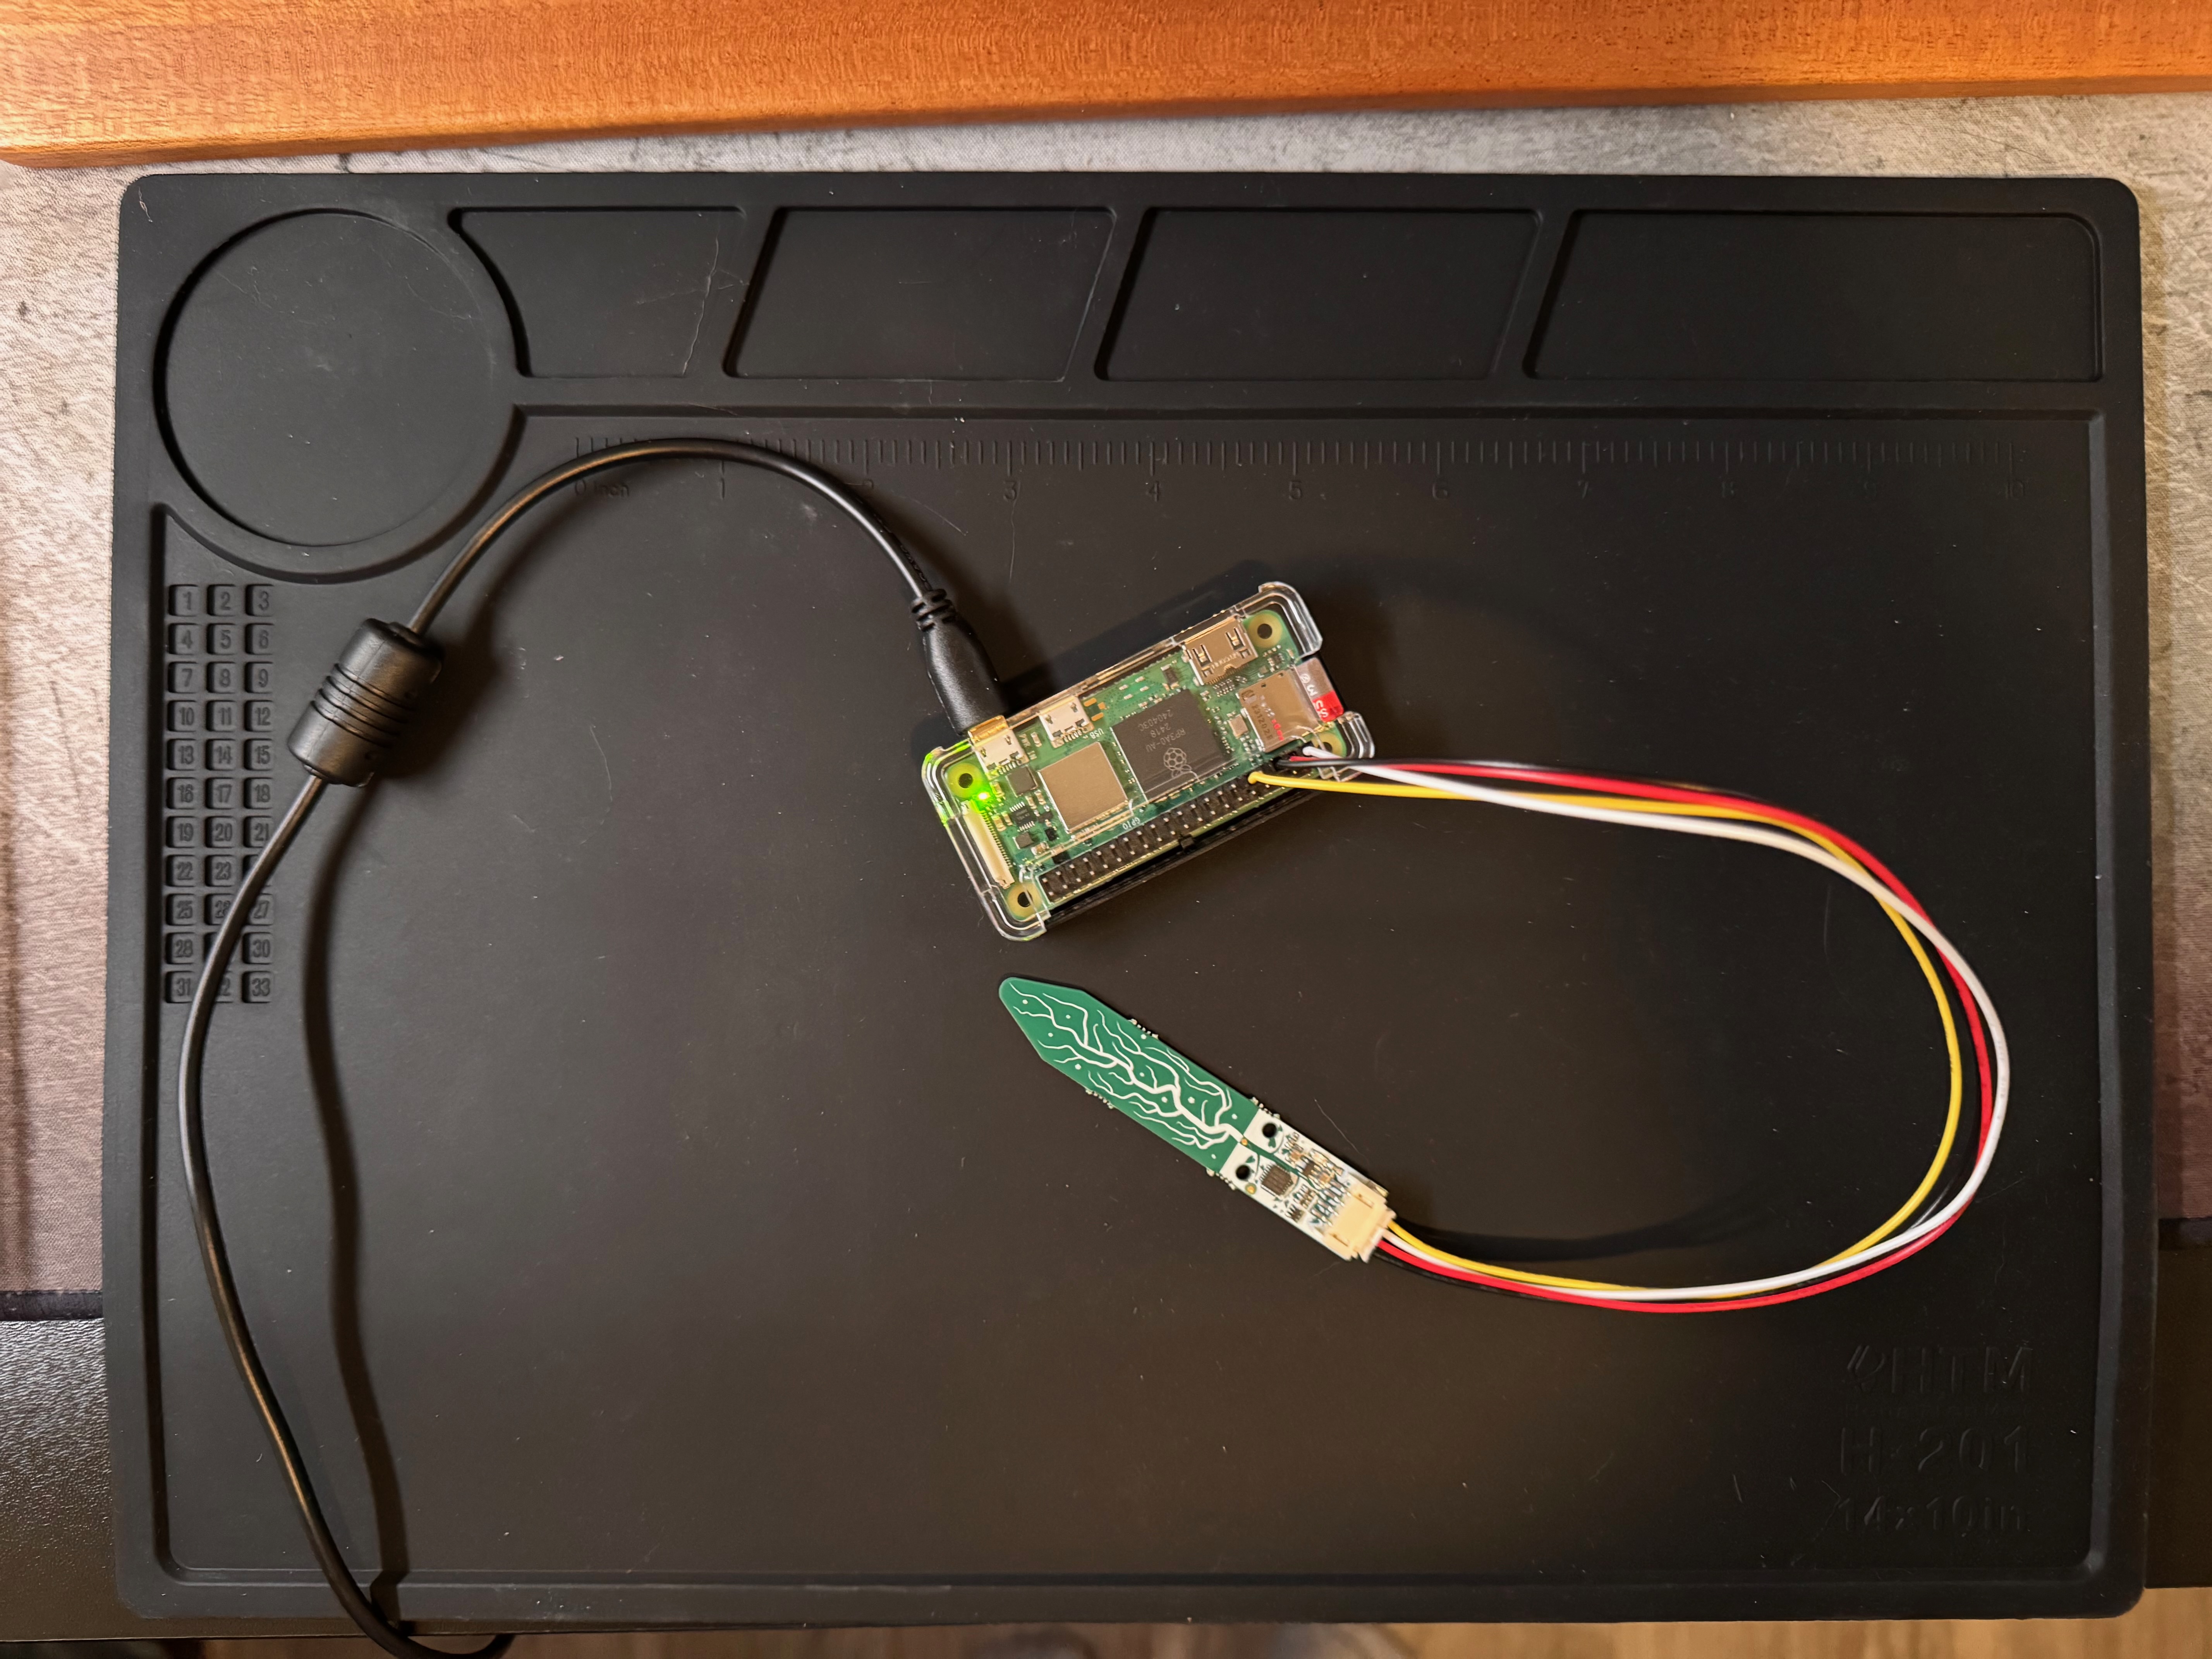
This project uses affordable and readily available components that can be assembled without any soldering:
Here’s what you’ll need for this project:
- Raspberry Pi Zero W 2 with Header.
- Adafruit STEMMA Soil Sensor - I2C Capacitive Moisture Sensor.
- A microSD card with Raspberry Pi OS lite installed.
- 1x JST PH 2mm 4-Pin to Female Socket Cable - I2C STEMMA Cable
Since I have never soldered before, I chose the model that comes with the headers pre-soldered, but you can choose the one without the headers if you’re comfortable soldering.
Wiring
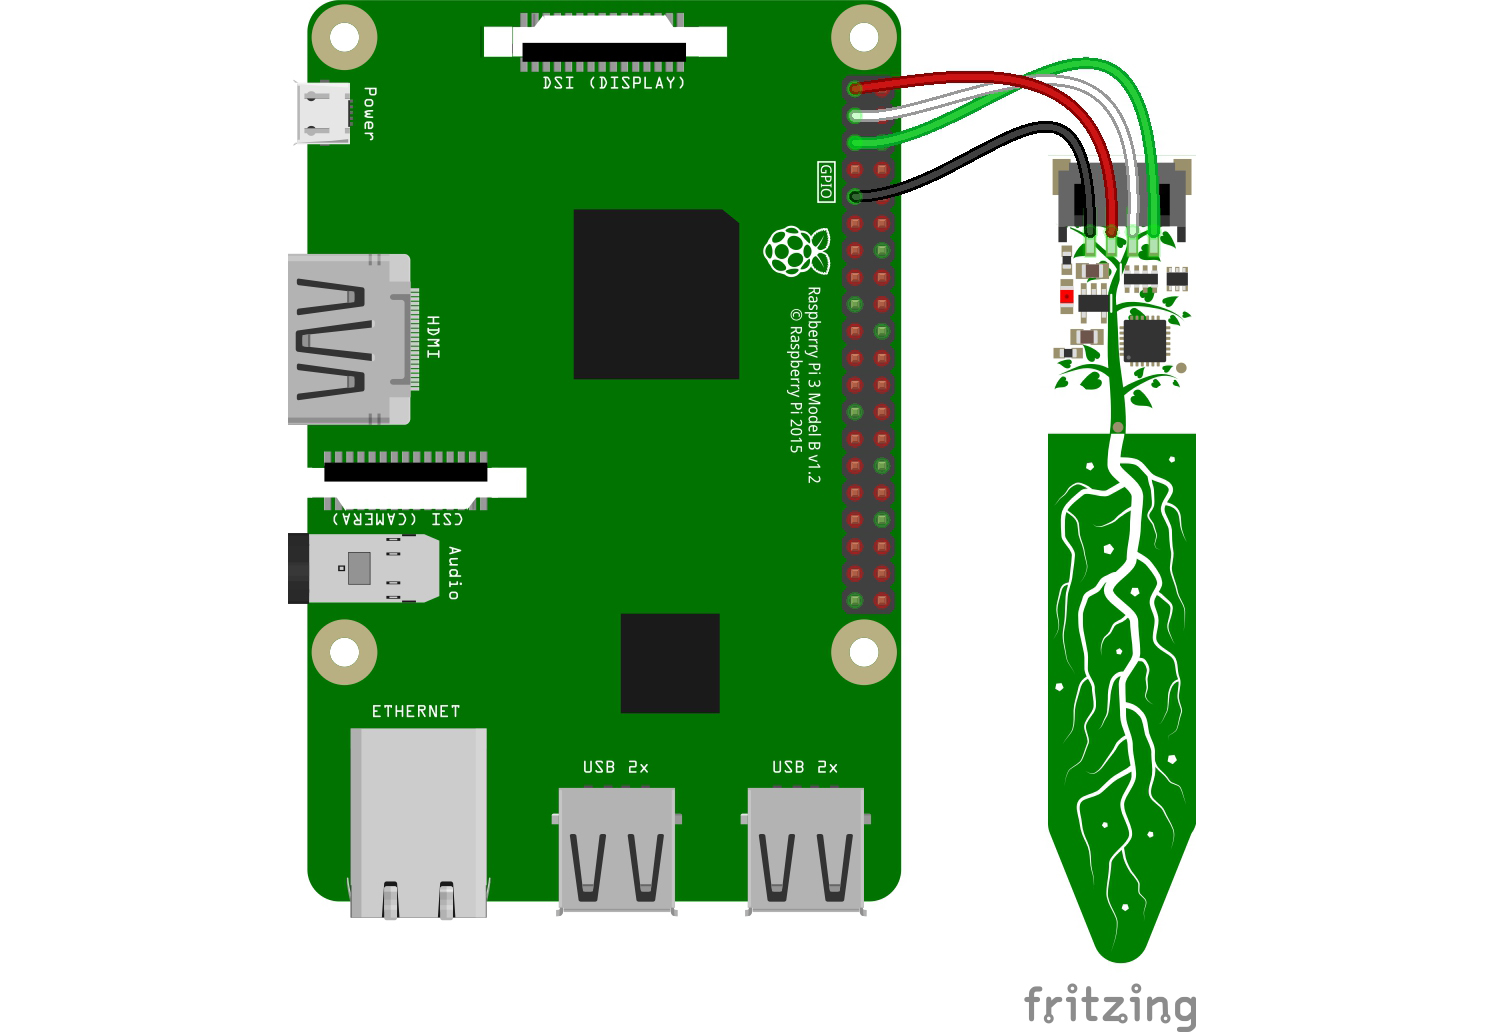
The STEMMA soil sensor communicates using I2C (Inter-Integrated Circuit), a standard protocol that makes connecting sensors to microcontrollers straightforward. The sensor requires just four connections:

The image above is a Raspberry Pi, but the Raspberry Pi Zero W 2 has the same GPIO pins.
- Pi 3V3 to sensor VIN
- Pi GND to sensor GND
- Pi SCL to sensor SCL
- Pi SDA to sensor SDA
Software
Enable I2C on the Raspberry Pi
Before we can use the soil moisture sensor, we need to enable I2C on the
Raspberry Pi. You can do this by running sudo raspi-config and navigating to
Interfacing Options -> I2C and enabling it.
sudo apt update
# install i2c-tools
sudo apt install i2c-tools
# Open raspi-config
sudo raspi-config
# Navigate to Interface Options > I2C > Enable
sudo i2cdetect -l
i2c-1   i2c             bcm2835 (i2c@7e804000)                  I2C adapter
i2c-2   i2c             bcm2835 (i2c@7e805000)                  I2C adapter

# Check the address of the sensor, it should be 0x36
sudo i2cdetect -y 1
     0  1  2  3  4  5  6  7  8  9  a  b  c  d  e  f
00:                         -- -- -- -- -- -- -- --
10: -- -- -- -- -- -- -- -- -- -- -- -- -- -- -- --
20: -- -- -- -- -- -- -- -- -- -- -- -- -- -- -- --
30: -- -- -- -- -- -- 36 -- -- -- -- -- -- -- -- --
40: -- -- -- -- -- -- -- -- -- -- -- -- -- -- -- --
50: -- -- -- -- -- -- -- -- -- -- -- -- -- -- -- --
60: -- -- -- -- -- -- -- -- -- -- -- -- -- -- -- --
70: -- -- -- -- -- -- -- --
Interacting with the Sensor
Now up until here, I was just following the instructions provided by Adafruit to get the sensor wired up to the Raspberry Pi. The next step was to write some code to read the sensor data. Adafruit provides a Python library to interact with the sensor, but I wanted to use Rust for this project.
I’ll admit I definitely used Claude Sonnet 3.5 to help me with this as some of
these things seemed like magic to me (like where the TEMP_CONVERSION_FACTOR
came from). But I was able to get it working!
Here’s how I did it:
- Install the Rust toolchain on your Raspberry Pi by following the instructions on the Rust website.
- Create a new Rust project using
cargo new rpi-plant-moisture. - Add the
i2cdevcrate to yourCargo.tomlfile:[dependencies] i2cdev = "0.6" - Write the following code in
src/main.rs:
use i2cdev::core::I2CDevice;
use i2cdev::linux::LinuxI2CDevice;
use std::error::Error;
use std::{thread, time::Duration};

const DEFAULT_I2C_PATH: &str = "/dev/i2c-1";

const SENSOR_ADDR: u16 = 0x36;

// Register addresses
const STATUS_BASE: u8 = 0x00;
const STATUS_TEMP: u8 = 0x04;
const TOUCH_BASE: u8 = 0x0F;
const TOUCH_READ: u8 = 0x10;

// SAMD10 temperature sensor returns raw 32-bit fixed-point values
// where each unit represents 1/65536 (≈0.00001525878) degrees Celsius.
const TEMP_CONVERSION_FACTOR: f32 = 0.00001525878;

struct SoilSensor<T: I2CDevice> {
    i2c: T,
}

impl<T> SoilSensor<T>
where
    T: I2CDevice,
{
    pub fn new(i2c: T) -> Result<Self, T::Error> {
        Ok(SoilSensor { i2c })
    }

    /// Returns the read temperature of this [`SoilSensor<T>`] in degrees Celsius (°C).
    /// The ambient temperature comes from the internal temperature sensor on the microcontroller,
    /// it's not high precision, maybe good to + or - 2 degrees Celsius.
    ///
    /// # Errors
    ///
    /// This function will return an error if the sensor fails to provide a value.
    pub fn read_temperature(&mut self) -> Result<f32, T::Error> {
        // Write the correct status registers for temperature
        let command = [STATUS_BASE, STATUS_TEMP];
        self.i2c.write(&command)?;

        // Wait for conversion
        thread::sleep(Duration::from_millis(5));

        // Read 4 bytes of temperature data
        let mut buf = [0u8; 4];
        self.i2c.read(&mut buf)?;

        // Apply mask to first byte as per Python implementation
        buf[0] &= 0x3F;

        // Convert to u32 using from_be_bytes and apply conversion factor
        let raw_temp = u32::from_be_bytes(buf);
        let temp = raw_temp as f32 * TEMP_CONVERSION_FACTOR;

        Ok(temp)
    }

    /// Returns the read moisture of this [`SoilSensor<T>`]. This value
    /// ranges from 200 (very dry) to 2000 (very wet).
    ///
    /// # Errors
    ///
    /// This function will return an error if the sensor fails to provide a value.
    pub fn read_moisture(&mut self) -> Result<u16, T::Error> {
        // Write both the base register and read command
        let command = [TOUCH_BASE, TOUCH_READ];
        self.i2c.write(&command)?;

        // Wait for conversion
        thread::sleep(Duration::from_millis(5));

        // Read 2 bytes of moisture data
        let mut buf = [0u8; 2];
        self.i2c.read(&mut buf)?;

        // Convert to moisture value using from_be_bytes
        let moisture = u16::from_be_bytes(buf);

        Ok(moisture)
    }
}

fn main() -> Result<(), Box<dyn Error>> {
    let args: Vec<String> = std::env::args().collect();
    let default_path = DEFAULT_I2C_PATH.to_string();
    let i2c_path = args.get(1).unwrap_or(&default_path).as_str();

    let i2c = LinuxI2CDevice::new(i2c_path, SENSOR_ADDR)?;
    let mut sensor = SoilSensor::new(i2c)?;

    println!("Starting soil sensor readings...");

    loop {
        match sensor.read_temperature() {
            Ok(temp) => println!("Temperature: {:.2}°C", temp),
            Err(e) => eprintln!("Error reading temperature: {}", e),
        }

        match sensor.read_moisture() {
            Ok(moisture) => println!("Moisture: {} (200 - 2000)", moisture),
            Err(e) => eprintln!("Error reading moisture: {}", e),
        }

        println!("---");
        thread::sleep(Duration::from_secs(1));
    }
}
Compile and run the code using the following commands:
cargo build --release
sudo ./target/release/rpi-plant-moisture /dev/i2c-1

# Output
Starting soil sensor readings...
Temperature: 25.68°C
Moisture: 350 (200 - 2000)
---
Temperature: 24.94°C
Moisture: 352 (200 - 2000)
---
Temperature: 25.15°C
Moisture: 351 (200 - 2000)
Setting Up the Monitoring Stack
Now that we have a working sensor implementation, let’s set up a monitoring system using Prometheus and Grafana. As always, you can find the complete code in the GitHub repository.
Instrumenting with Prometheus
-
Add the following dependencies to your
Cargo.tomlfile:[dependencies] axum = "0.8.1" hyper = { version = "1.5.2" } i2cdev = "0.6.1" lazy_static = "1.5.0" prometheus = "0.13.4" tokio = { version = "1.42.0", features = ["macros", "rt-multi-thread"] } -
Define the Prometheus metrics in your Rust code:
use prometheus::{opts, register_gauge, Encoder, Gauge, TextEncoder}; use lazy_static::lazy_static; lazy_static! { static ref TEMPERATURE_GAUGE: Gauge = register_gauge!(opts!("temperature", "Temperature in degrees celsius")).unwrap(); static ref MOISTURE_GAUGE: Gauge = register_gauge!(opts!( "moisture", "Soil moisture ranging from 200 (very dry) to 2000 (very wet)" )) .unwrap(); } // Previous implementation of SoilSensor struct and methods -
Update the
loopto set the gauges after each reading. We use gauges here since the value can go up and down.// src/main.rs loop { match sensor.read_temperature() { Ok(temp) => { // Update the gauge with the temperature value TEMPERATURE_GAUGE.set(temp.into()); println!("Temperature: {:.2}°C", temp) } Err(e) => eprintln!("Error reading temperature: {}", e), } match sensor.read_moisture() { Ok(moisture) => { // Update the gauge with the moisture value MOISTURE_GAUGE.set(moisture.into()); println!("Moisture: {} (200 - 2000)", moisture) } Err(e) => eprintln!("Error reading moisture: {}", e), } println!("---"); thread::sleep(Duration::from_secs(args.interval_seconds)); } -
Expose the metrics over HTTP by defining the HTTP route
/metrics:// src/main.rs let app = Router::new().route( "/metrics", get(|| async { let encoder = TextEncoder::new(); let mut buffer = vec![]; let metrics = prometheus::gather(); encoder.encode(&metrics, &mut buffer).unwrap(); ( [(header::CONTENT_TYPE, "text/plain")], String::from_utf8(buffer).unwrap(), ) }), ); tokio::spawn(async move { let addr = "0.0.0.0:3000" let listener = tokio::net::TcpListener::bind(&addr).await.unwrap(); println!("Prometheus metrics are available at http://{addr}/metrics",); axum::serve(listener, app).await.unwrap(); }); -
Run the Rust code and access the metrics at
http://<your_raspberry_pi_ip>:3000/metrics.curl http://pi-callie.local:3000/metrics # HELP moisture Soil moisture ranging from 200 (very dry) to 2000 (very wet) # TYPE moisture gauge moisture 1000 # HELP temperature Temperature in degrees celsius # TYPE temperature gauge temperature 20.521106719970703
Grafana Setup
-
Run Prometheus and Grafana using Docker Compose. Create a
docker-compose.ymlfile:services: grafana: image: grafana/grafana-oss restart: unless-stopped ports: - '3000:3000' links: - prometheus prometheus: image: prom/prometheus restart: unless-stopped ports: - '9090:9090' volumes: - ./prometheus.yml:/etc/prometheus/prometheus.yml command: - '--config.file=/etc/prometheus/prometheus.yml' -
Create a
prometheus.ymlfile:global: scrape_interval: 15s # How frequently to scrape targets evaluation_interval: 15s # How frequently to evaluate rules scrape_configs: - job_name: 'pi-callie' static_configs: - targets: ['pi-callie.local:3000'] metrics_path: '/metrics' scheme: 'http' -
Start the containers with
docker-compose up -dcommand. -
Access Grafana at
http://localhost:3000(default credentials: admin/admin) and add Prometheus as a data source with the URLhttp://prometheus:9090.- Navigate to Configuration > Data Sources
- Click “Add data source” and select Prometheus
- Set the URL to
http://prometheus:9090 - Click “Save & Test” to verify the connection
-
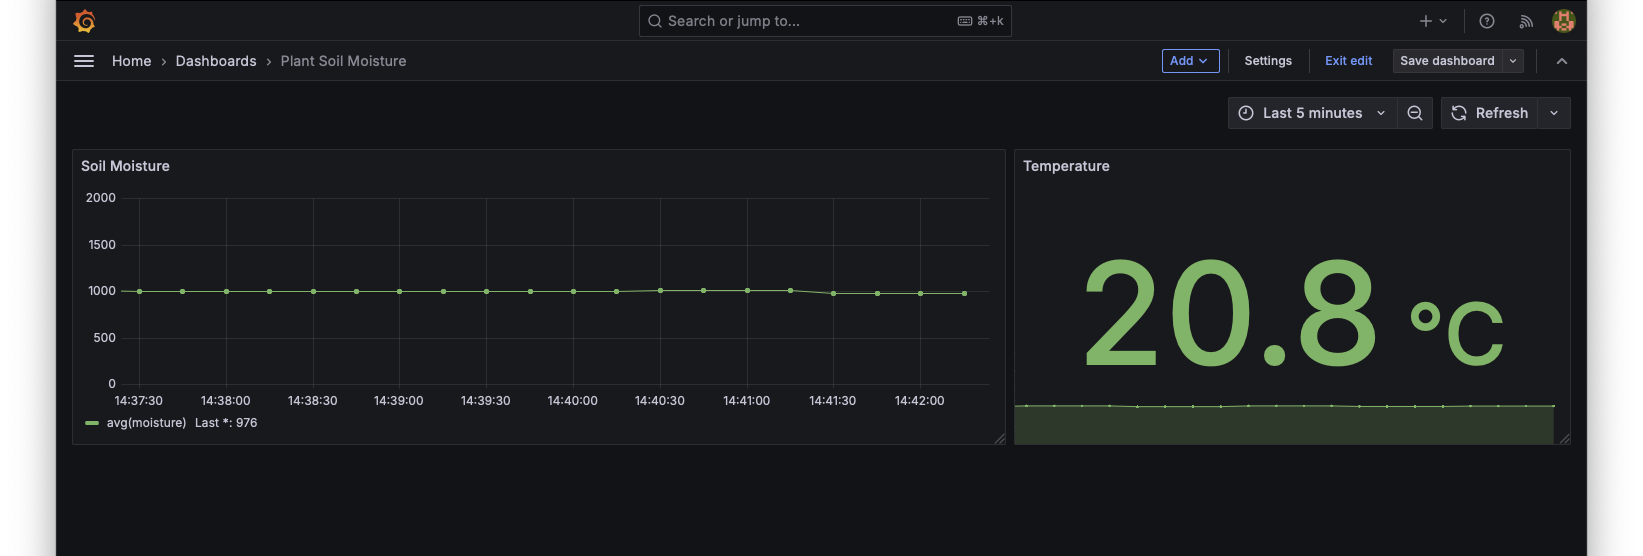
Create a dashboard and add panels for temperature and moisture metrics using the Prometheus queries
temperatureandmoisture. That’s it! You now have a plant moisture monitoring system that reads data from the soil moisture sensor and visualizes it using Prometheus and Grafana.

Conclusion
In this post, I walked through how to build a plant moisture monitoring system using a Raspberry Pi Zero W 2 and a soil moisture sensor. We covered the hardware setup, wiring, and software implementation using Rust. The project demonstrates how to read sensor data, expose metrics via HTTP, and visualize them using Prometheus and Grafana. Despite being my first hardware project, it was a fun learning experience that combined physical computing with software development. The end result is a practical solution for monitoring plant health and automating the plant care process. Whether you’re a plant parent or just interested in IoT projects, this setup provides a great starting point for similar monitoring systems.
If you made this far, thanks for reading! I hope you found this post interesting and useful. If you have any questions or feedback, feel free to open an issue on my GitHub repository.
