Implementing a Terraform state backend on Cloudflare Workers
![]()
Preface
If you are just hearing about Terraform for the first time, the introduction to this post attempts to outline all the necessary information to get up to speed. For the already initiated, feel free to skim through the introduction before diving into the details of creating your own HTTP Terraform Backend on Cloudflare Workers.
Introduction to Terraform
Terraform is a popular open-source tool for defining infrastructure-as-code and is primarily developed by HashiCorp. Terraform works by declaring your resources in code written using the HashiCorp Configuration Language (HCL) and then running a couple commands to create, edit, or delete the mentioned resources.
The project has gained lots of popularity, especially in the “Cloud Native” world and many organizations now maintain their own Terraform Providers that can be used to interface with their platform.
Terraform works by using a combination of three things. First, the locally defined .tf files containing all your
resource declarations. Second, the terraform.tfstate file (locally by default and the subject of this post) which is
used to maintain a record of resources managed by terraform and their last known configured state. Finally, we have the
remote (or upstream) definition of the resource. Anytime the terraform plan or terraform apply commands are invoked,
all three of these things are checked to determine the course of action terraform will attempt to perform to ensure
everything aligns with what is defined in the .tf files.
A “Hello, World” example
Creating a new directory with a file main.tf, which is the entrypoint for terraform, we can declare the existence of
a local file named hello.md with the contents of Hello, World!.
# main.tf
terraform {
  required_providers {
    local = {
      source  = "hashicorp/local"
      version = "2.2.3"
    }
  }
}

resource "local_file" "hello_md" {
  content  = "Hello, World!"
  filename = "hello.md"
}
Running the command terraform plan, Terraform will detect that a new file needs to be created and display a plan
to create that file.
$ terraform plan

Terraform used the selected providers to generate the following execution plan. Resource actions are indicated with the
following symbols:
  + create

Terraform will perform the following actions:

  # local_file.hello_md will be created
  + resource "local_file" "hello_md" {
      + content              = "Hello, World!"
      + directory_permission = "0777"
      + file_permission      = "0777"
      + filename             = "hello.md"
      + id                   = (known after apply)
    }

Plan: 1 to add, 0 to change, 0 to destroy.
Running terraform apply will then prompt you for confirmation before creating the file.
$ terraform apply
...

local_file.hello_md: Creating...
local_file.hello_md: Creation complete after 0s [id=0a0a9f2a6772942557ab5355d76af442f8f65e01]

Apply complete! Resources: 1 added, 0 changed, 0 destroyed.
We can then confirm that the new file was created in the current directory, along with another file
named terraform.tfstate, which is a JSON file representing the last known state for all the managed resources.
$ cat hello.md
Hello, World!

$ ls -l
total 24
-rwxr-xr-x  1 cole  staff   13 Sep 18 13:20 hello.md
-rw-r--r--  1 cole  staff  216 Sep 18 12:58 main.tf
-rw-r--r--  1 cole  staff  834 Sep 18 13:20 terraform.tfstate
Doing cat terraform.tfstate we can then see the contents of the tfstate file.
{
  "version": 4,
  "terraform_version": "1.2.9",
  "serial": 1,
  "lineage": "7d5540fe-2ad8-3172-ed63-5f6471c34756",
  "outputs": {},
  "resources": [
    {
      "mode": "managed",
      "type": "local_file",
      "name": "hello_md",
      "provider": "provider[\"registry.terraform.io/hashicorp/local\"]",
      "instances": [
        {
          "schema_version": 0,
          "attributes": {
            "content": "Hello, World!",
            "content_base64": null,
            "directory_permission": "0777",
            "file_permission": "0777",
            "filename": "hello.md",
            "id": "0a0a9f2a6772942557ab5355d76af442f8f65e01",
            "sensitive_content": null,
            "source": null
          },
          "sensitive_attributes": [],
          "private": "bnVsbA=="
        }
      ]
    }
  ]
}
Modifying or removing the resource outside of terraform will cause the next terraform <plan|apply> to produce the
necessary changes to return to the declared resources state. Using terraform with the state stored locally works well
for
hobby projects or just trying it out but once multiple people begin editing the files, keeping the state consistent
across all their computers becomes a challenge. To get around this, terraform has the concept of a remote state backend
which maintains the state elsewhere for it to be shared amongst multiple users.
The remainder of post is about implementing your very own HTTP state provider using Cloudflare Workers , Durable Objects and R2 (Cloudflare’s S3-compatible object store).
Defining the API
Before we can write any code we first need to understand what the interface for the backend looks like and what it
expects when issued any HTTP requests. The information page for
the http backend has the following description for the
API.
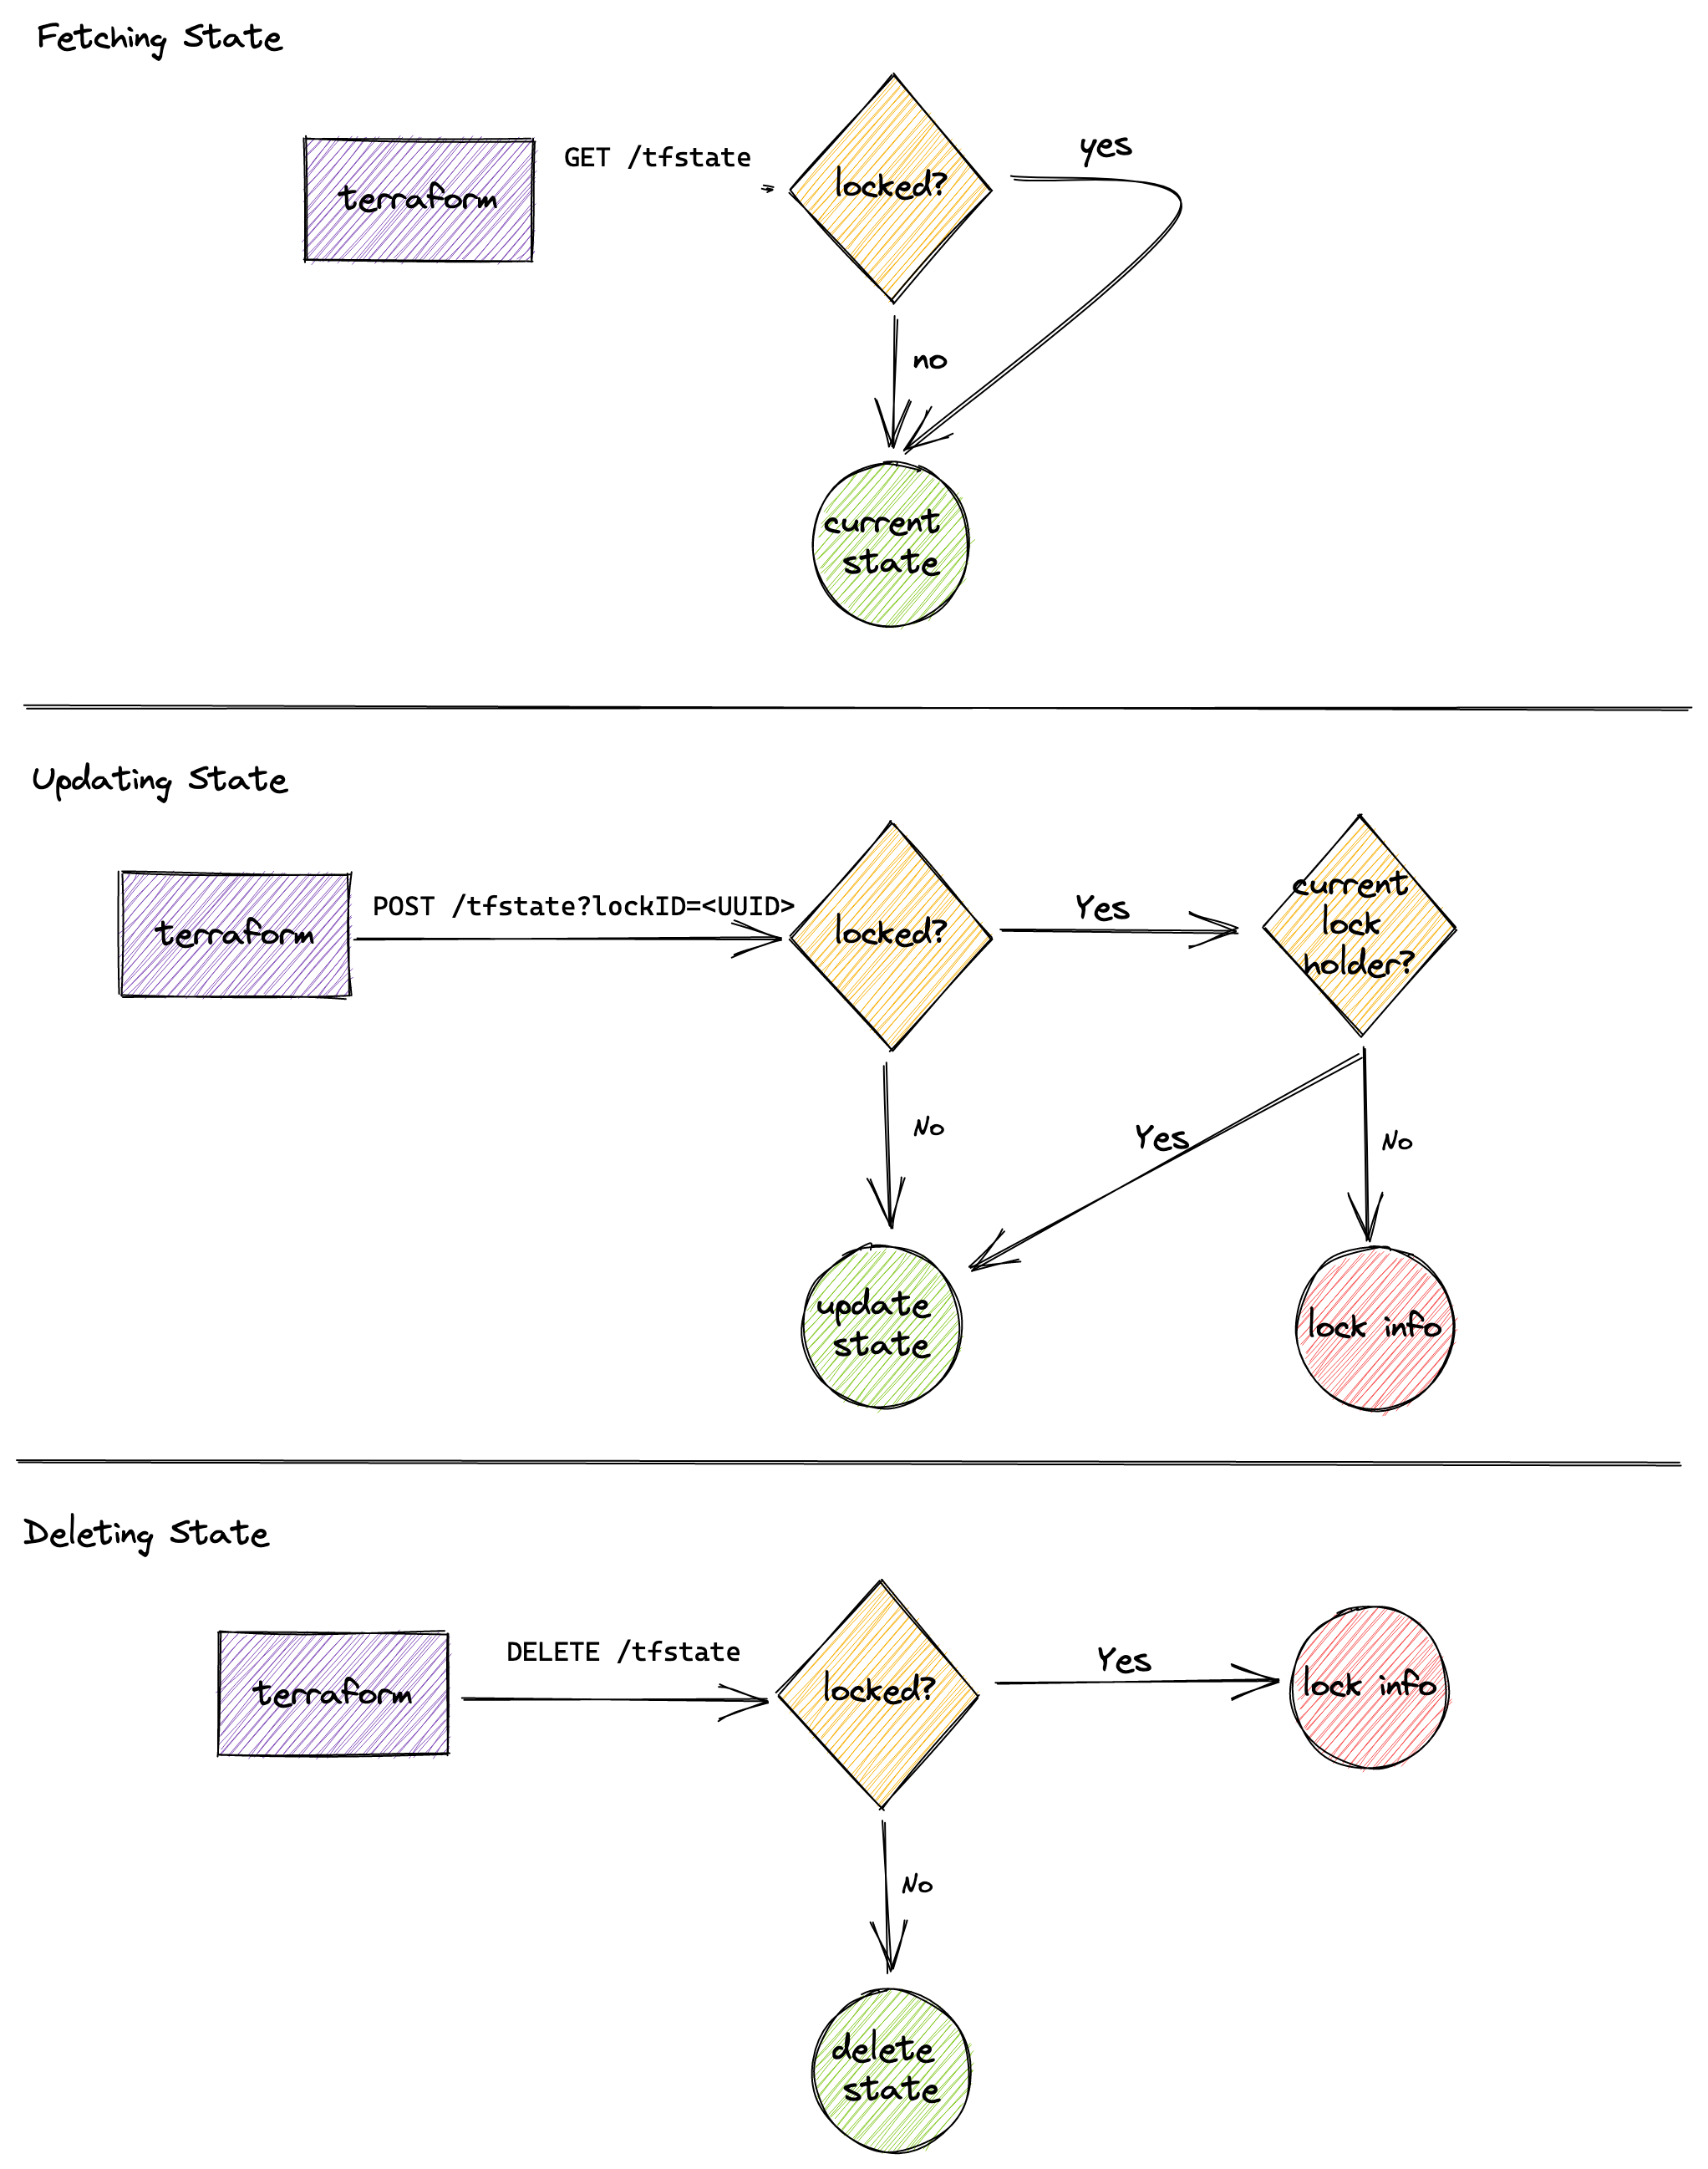
State will be fetched via GET, updated via POST, and purged with DELETE. The method used for updating is configurable.
Sounds pretty simple. What if we also want to support state locking?
This backend [http] optionally supports state locking. When locking support is enabled it will use LOCK and UNLOCK requests providing the lock info in the body. The endpoint should return a 423: Locked or 409: Conflict with the holding lock info when it’s already taken, 200: OK for success. Any other status will be considered an error. The ID of the holding lock info will be added as a query parameter to state updates requests.
While it sounds just as simple as the first description, there is actually a fair bit of ambiguity that needs to
be figured out. Can one request the current state when it is locked or should a 423: Locked be returned if they are
not the lock holder? What about the line “lock info will be added as a query parameter to state
updates requests”. Is deleting the state included in the “state update requests”? Luckily
the code is open-source, so
we can dive in to see the expected behaviors for the client.
Can someone request the current state when it is locked?
Yes.
The .Get() state method does not include the lock info when making a request. The method also does not handle the
aforementioned locking codes, 423: Locked and 409: Conflict. Using this
information we get to decide the
behavior for fetching the state when it is locked. Given this is a read-only operation this will be allowed,
even when then state is locked. 1
Are DELETE requests considered a state update request?
Yes and no.
The “specification” states that all “lock info will be added as a query parameter to state
updates requests” but one can see that the current lock info is not included in the .Delete() request. 2
While it is unclear whether .Delete() should be considered a state update request or not, deleting the state,
even when locked, could have consequences when running apply. This is because of the lifecycle terraform follows
when making state changes is something akin to:
- Lock the state
- Fetch the current remote state
- Refresh the resource from upstream
- Compute the plan
- Apply plan
- Update the remote state
- Unlock the state
If step 1 succeeded but the state was deleted before step 2, the plan would detect all managed resources have been deleted and would propose a plan to create all the managed resources (even though they already exist!). For this reason, we will not support deleting the state while it is locked.
Summary of the API
All routes will follow the HTTP path patterns and use HTTP Basic Auth for authentication.
GET /states/:projectName: return the current state for:projectNamePOST /states/:projectName: update the current state for:projectNameLOCK /states/:projectName/lock: lock the state for:projectNameUNLOCK /states/:projectName/lock: unlock the state for:projectName
Any requests that modify the state will add the query parameter ?ID=<UUID>.
The following diagram represents the flow the API will follow. For the sake of brevity, I did not draw LOCK/UNLOCK.
Implementation details
As I mentioned in the introduction, we will be building out the backend using Cloudflare Workers. The code will be written in TypeScript and the locking implemented using Durable Objects. The actual state file will be stored on Cloudflare R2.
Implementing authentication details is out of scope for this post, however we will assume that the HTTP Basic Authorization header is valid as the username will be used effectively “namespace” the state files to support multiple users along with multiple projects for each user.
All the code is available over on GitHub.
Router
Routing will be done using itty-router.
// src.index.ts
import { Router } from "itty-router";

const router = Router();

export default {
  async fetch(
    request: Request,
    env: Env,
    ctx: ExecutionContext,
  ): Promise<Response> {
    router.get(
      "/states/:projectName",
      withIdentity,
      withParams,
      getStateHandler,
    );
    router.post(
      "/states/:projectName",
      withIdentity,
      withParams,
      putStateHandler,
    );
    router.delete(
      "/states/:projectName",
      withIdentity,
      withParams,
      deleteStateHandler,
    );

    router.all(
      "/states/:projectName/lock",
      withIdentity,
      withParams,
      lockStateHandler,
    );

    router.all("*", () => new Response("Not found.\n", { status: 404 }));
    return router.handle(request, env);
  },
};
Notice that all HTTP verbs are forwarded for the path /states/:projectName/lock. This is because
the lockStateHandler forwards the entire request directly to a Durable Object, which contains its own
internal itty-router and logic for those routes.
Durable Locking
As part of the requirements to implement locking, we need some mechanism to maintain locks on the states. For this I
chose to use Durable Objects (DO) and the
nomenclature “Durable Lock” to specify the implementation. DO’s have a special guarantee that only one instance exists
across the globe for a given ID. All requests to the DO are routed to the same instance of the object. They also provide
access to persistent storage which will be used to store the current lock info. The Durable Locks will use the
format :username/:projectName.tfstate. As a convenience the following function will template the string in the desired
format.
const getObjectKey = (username: string, projectName: string) =>
  `${username}/${projectName}.tfstate`;
As mentioned above, the lockStateHandler that forwards the requests to the Durable Object will look something like:
export const lockStateHandler = async (
  request: RequestWithIdentity & RouteParams,
  env: Env,
) => {
  const { projectName } = request;
  const username = request.identity?.userInfo?.username || "";
  if (!projectName || projectName === "")
    return new Response("No project name specified.", { status: 400 });
  if (!username || username === "")
    return new Response("Unable to determine username", { status: 500 });
  const id = env.DURABLE_LOCK.idFromName(getObjectKey(username, projectName));
  const lock = env.DURABLE_LOCK.get(id);
  return lock.fetch(request);
};
When issued a valid LOCK request, given the state is not already locked, the Durable Object will store the provided
lock info in the key _lock. The presence of any value in the _lock key is used to indicate a lock on the state has
been acquired. All attempts to lock the state by another user, or to update the state with the incorrect lockID will
be met with a 423: Locked.
// src/durableLock.ts
export class DurableLock {
  // parts omitted for brevity

  // LOCK /states/:projectName/lock
  private async lock(request: Request): Promise<Response> {
    return this.state.blockConcurrencyWhile(async () => {
      if (this.lockInfo) return Response.json(this.lockInfo, { status: 423 });
      const lockInfo = (await request.json()) as LockInfo;
      await this.state.storage.put("_lock", lockInfo);
      this.lockInfo = lockInfo;
      return new Response(); // 200: OK
    });
  }
}
The format of the lock payload is fairly straight forward.
// LockInfo
// https://github.com/hashicorp/terraform/blob/cb340207d8840f3d2bc5dab100a5813d1ea3122b/internal/states/statemgr/locker.go#L115
export interface LockInfo {
  ID: string;
  Operation: string;
  Info: string;
  Who: string;
  Version: string;
  Created: string;
  Path: string;
}
Now you may have been wondering: Why not store the terraform state in durable object storage? The reason for not doing so is that the limit for each value per key stored object is 128 KB. For large projects, 128 KB is simply not enough storage for an entire state file.
Storing state in R2
As with any object store, every blob is stored using a combination of a bucket and a key. The key for this project will
use the same format as the Durable Locks, :username/:projectName.tfstate. For
example, curl -u terraform:password https://tfstate.example.com/states/hello-world would map to the
key terraform/hello-world.tfstate. Using this pattern allows us to remove the need for any additional methods for
mapping between users, states and their underlying locks and R2 keys. It also allows us to specify the username as
the prefix when listing objects to get a list of states for a given username.
All states are treated as opaque values and simply just passed between as-is to the underlying storage.
export const getStateHandler = async (
  request: RequestWithIdentity & RouteParams,
  env: Env,
) => {
  const { projectName } = request;
  const username = request.identity?.userInfo?.username || "";
  if (!projectName || projectName === "")
    return new Response("No project name specified.", { status: 400 });
  if (!username || username === "")
    return new Response("Unable to determine username", { status: 500 });
  const state: R2ObjectBody = await env.TFSTATE_BUCKET.get(
    getObjectKey(username, projectName),
  );
  if (!state) return new Response(null, { status: 204 });
  return new Response(await state?.arrayBuffer(), {
    headers: { "content-type": "application/json" },
  });
};
Deploying to Cloudflare
Using the Workers CLI, wrangler in addition to the configuration file wranger.toml we can deploy the worker to our
Cloudflare Account. Once setup, and after creating the tfstate bucket, simply running wrangler publish src/index.ts
will deploy your code across the globe.
Using the new backend
Now that we’ve built and deployed the backend using Cloudflare Workers, it’s time to give it a go. Revisiting the
example from the introduction, we can define the backend section in the main.tf file.
terraform {
  backend "http" {
    address        = "https://tfstate.example.com/states/hello-world"
    lock_address   = "https://tfstate.example.com/states/hello-world/lock"
    unlock_address = "https://tfstate.example.com/states/hello-world/lock"
    username       = "terraform"
    password       = "password"
  }

  required_providers {
    local = {
      source  = "hashicorp/local"
      version = "2.2.3"
    }
  }
}

resource "local_file" "hello_md" {
  content  = "Hello, World!"
  filename = "hello.md"
}
Re-initialize the project using terraform init -reconfigure and then accept the prompt to push the current local state
to the remote backend. The next run of terraform <plan|apply> will now use the remote state stored in R2.
FAQ
Why would I use this over the S3 backend with R2?
If you do not require locking, then the S3 backend may be more appropriate. The S3 backend only supports locking via DynamoDB.
How can I support basic auth with my own usernames and passwords?
There are many ways to implement your own basic authorization scheme. Instead of having to securely manage usernames, passwords and authorization policies I opted for Cloudflare Access and service tokens.
Using my own API
Gateway, I shim the values from the authorization
header into the necessary Cf-Access-Client-Idand Cf-Access-Client-Secret headers to be allowed through my defined
access policies. The username and password are the Client ID and Client Secret, respectively.
Why did I build this?
I needed a remote state provider to manage my terraform state and I figured it would be a fun learning exercise to implement.
How much would this cost me to run?
Approx. $5/month as long as you stay within the very generous free tiers for Cloudflare Workers and R2.